Journal Entries of Making a Phonograph
Wednesday - April 7, 2004
Several weeks ago Professor Kraus handed out our end of the semester Blog Assignment. Today I proposed to her, my interest in creating a phonograph with inspiration from the paleoacoustics group. Approximately a year ago my boyfriend Bernie and I, were watching a show called Rough Science. In this show they took scientists from several different fields such as: a botanist, biologist, physicist, and chemist, and placed them all on an island each with a detailed assignment that related to their field. Their main objective was to create a specified modern day machine, out of materials from nature, and depending on what the object was sometimes scrap metal was allotted.
With the guidance of Bernie, who happens to be quite intellectually blessed as well as carpenter by trade, I think that this will be not only a very interesting endeavor, but also something quite amazing if it is successful.
Friday – April 9, 2004
This morning in an effort to find ideas on how to approach this assignment I did a
Google search on “how to make a phonograph.” I clicked on:
“Phonograph Makers’ Pages
http://members01.chello.se/christer.hamp/phono/
This was a very interesting website, however this was more of a site for those who
have made a phonograph before, perhaps even regularly, and was therefore lacking in the remedial information that I required. Likewise, while all of the phonographs were homemade, all that were represented were composed of electronic media.
Yet, as I scrolled through the site I saw a section entitled, “Hints for phonograph makers.” Hopefully these trouble-shooting tips will prove useful should I have any problems producing sound once the phonograph is built.
Another interesting attribute to this website was their section on “Archaeoacoustic” which naturally coincides with paleoacoustics. [ ... ]
Recalling that the phonograph that I had seen on Rough Science was made with a wax cylinder, I made my next query more specific and searched “how to make a phonograph using wax.” Again, I was finding only websites that catered to those already knowledgeable about the process. However, on the second page I found:
The Creative Science Centre – by Dr. Jonathan P. Hare
http://www.creative-science.org.uk/RS2phono.html
It just so happens that this site lead me to the Rough Science Phonograph, which was great! I really found a lot of basic information and instruction on methods to construct a phonograph. I was reeling with excitement when I read the bottom of the page:
If you are amazingly jammy-lucky you might have two recordings, if just jammy, one recording and if you are just normal lucky it won’t have worked!! I would guess that you have a 1 in a 100 chance of it working when you first try it out- you need a lot of experience and experimenting to record something.”
Of course I knew that this task would not be an easy one when I began, but
reading that sure was discouraging. Well, Bernie and I have pretty good luck together – I don’t know about “amazingly jammy-lucky” but we’ll try.
Wednesday – April 13, 2004
To see if I could gather any further information from Rough Science, I did another Google search for “rough science, phonograph,” and found their main site: http://www.pbs.org/weta/roughscience/scientists/jonathan/diary_carriacou_1.html.
I would highly recommend exploring this entire site, as it is extremely interesting.
However, if you want to go directly to the “The Challenge: Record a Sound or Voice,” then go to: http://www.pbs.org/weta/roughscience/challenges/sound/. This site does a nice job of breaking down what exactly sound is, how it travels, and how it is received.
Sunday – April 18, 2004
Today Bernie and I went to Home Depot to get our supplies. They were as follows:
• 1 – 3/4 All-thread
• 1 – 1/4 All-thread
• 1 – 2x6
• 1 - 2x4
• 1 - half inch plywood
• 1 – 3/4 dowel
• 4 – eye bolts
• 2 – mending plates
• 4 – 1/4 nuts
• 2 - hinges
• 1 – aluminum funnel
• 1 – aluminum painters bucket
• 1 – sewing needle
• 1 – peach can
• 1 – roll of aluminum tape
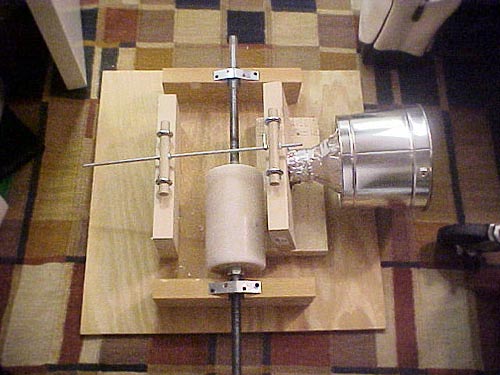
There were no step-by-step instructions given, mostly only pointers. So Bernie and I sat there for a good hour just looking at the image from the Rough Science webpage trying to figure out exactly how it was going to be put together. After committing to a plan of action we then began working on building the base for the phonograph:
• cut the ply wood into a 2x2 piece for the base
• cut the 2x4 into 2 – 1 foot pieces for the arms that cradle the cylinder. These arms had a groove cut out at the top with a bolt placed within to hold the 3/4 rod of all-thread.
• cut the 2x6 into 3 – 1 foot pieces. The front piece where the funnel will be placed has a hole cut out of the center using a hole saw bit. 1 – 2x6 piece is screwed into the base to create elevation for the funnel. The two remaining pieces are placed on the front and back to support the funnel and its adjustments.
Including time for preparation, planning, measuring, cutting, and in some cases re-cutting, this was accomplished in approximately 3 hours.
Tuesday – April 20, 2004
Finally realizing what exactly I had gotten myself into, I turned back to the Internet to see if I could find an easier method to this madness. I figured if I can make a pinhole camera out of an empty can of oatmeal, there should certainly be an easier way to construct a phonograph. I Googled “science fair, phonograph using wax.” The first hit that came up was:
Phonograph Makers: Rob Lomas
http://www.members01.chello.se/christer.hamp/phono/lomaschild.html
The picture was encouraging, it was of an 11-year-old girl holding her phonograph, which was very simply made, and the materials were essentially construction paper and wood. However, nor my father or boyfriend for that matter are a part of the Phonograph Makers society that I have seen plastered all over the Internet almost as much as Thomas Edison’s phonograph.
While the material in this phonograph was simpler than what we had purchased, the set up was almost identical to the Rough Science model. Therefore, I decided to stay on track with what we already had.
Saturday – April 24, 2004
Drawing near the due date, today we spent 5 hours completing the construction of the phonograph. We screwed two eyebolts into the top of front and back of the 2x6 pieces. The dowel was then cut to slide into those eyeholes. Then a hole was drilled through the center of both dowels so that the 1/4-inch all-thread could fit. One nut was placed on either side of the two dowels (these nuts act as fine tuner for the pressure adjustment of the stylus – this allows us to make adjustment as small as 1/100th of a mm). We then cut a number of 3 1/2 inch holes through the left over plywood and glued them all together to form our cylinder. At this point we drilled the 3/4-inch piece of all-thread through its center, placed it back into the cut out grooves of the arms. The bolts holding the all-thread in place were each covered with a mending plate. The two hinges were screwed into either side of the front 2x6 piece that holds the funnel and attached it to the 2x6 base. These hinges will allow general adjustments to the pressure of the stylus.
To make the cone, we cut a hole out of the bottom of the aluminum painters bucket. Then we placed the aluminum funnel inside so that the narrowest end was sticking out of the bottom. At the tapered end of the funnel we affixed the peach can with the bottom cut out. On the bottom of the peach can we placed aluminum tape over the opening to act as the diaphragm. Through the diaphragm we pushed the stylus and then used epoxy around it to hold the needle firmly in place.
Monday – April 26, 2004
With the end of the semester drawing to an end, I was finding myself with less and less time to work on the phonograph without ignoring my other studies. The Blog assignment is due tomorrow and I still haven’t put the wax on the cylinder. So I emailed Professor Kraus to ask for and extension and she graciously obliged.
Friday – April 30, 2004
Today I put the wax on the cylinder of the phonograph. And while this sounded like one of the easier parts of the project, it has ended up to be not only one of the most difficult, but also the most time consuming.
In order to properly melt the wax I needed to use a double boiler. I filled a large pot with water and set it on the stove and then place an even larger flat bottom frying pan on top to melt the wax. After the wax had melted I took the cylinder along with the all-thread rod intact, and spun it in the wax. To make an attempt at keeping the cylinder as evenly coated with wax as possible, I had to continue quickly spinning the cylinder as it came out of the hot wax and place it back into the grooves of the arms to let the layer dry. This process was aided by using a fan to excel the drying process. I repeatedly did this for approximately 2 1/2 hours until I had a 1/4-inch thick layer of wax around the cylinder.
After letting the cylinder completely cool, I filed done the wax by running a utility knife blade along its surface. It is very important to have a smooth and level surface for recording. Despite the fact that I had been carefully shaving down the cylinder for an hour, there was still much more that needed to be done.
Sunday – May 2, 2004
Today I spent another hour filing down the wax cylinder and it’s still not perfectly even. This is a very key element because the stylus does not move with the contours of the wax. Any “hills” remaining on the cylinder will cause the “valleys” not to record. Therefore, the wax must be taken down to its lowest common denominator. However, I’m almost inclined to try recording something, as there seems to be large enough portions of even wax to produce sound.
Sunday Evening
Bernie and I have decided to try and work with what we got. And while we were not “amazingly jammy-lucky,” we did make progress each time we tried it.
The first time, I turned the cylinder while Bernie yelled into the funnel. When playing it back we heard nothing. The problem seemed to be that we had hit one of those “valleys” I had discussed earlier. We also thought that maybe we need to slow done the revolutions when turning.
Rolling the cylinder to a smooth section, Bernie and I switch jobs and he turned the wheel as I yelled into the funnel. While we did not get anything audible, we did produce sound. Now what I mean by “sound” is that we produced something that sounds like the scratch at the beginning or end of a record. All this really means is that we constructed the phonograph correctly and thus has the potential to record and play back audible sound.
The third time, we again switch job so that I was turning the wheel and Bernie was yelling into the funnel. We had figured that it might be better that Bernie makes the recording considering that his voice is considerably deeper and therefore produce more vibrations – much like the bass in your stereo. Playing back the recording, I thought I heard something! It sounded like a voice on fast forward! We rewound the cylinder again and played it back, this time more slowly. I don’t know what I heard, it sounded like a voice, but you couldn’t make out any words. We almost had it, but not quite.
Bernie and I weren’t sure if it was the pressure, the diaphragm, or the stylus itself. Bernie thought that it might be that the diaphragm is not vibrating enough. The tricky thing about the diaphragm is that if it’s too hard, the stylus will drag into the wax instead of bouncing on top of it. Likewise, if the diaphragm is not sturdy enough the stylus will also drag along the wax. Not even knowing if the diaphragm is the issue, putting a new one in will be very time consuming. So Benrie and I have decided to take a breather and really think about what the problem is before we just jump in and make possible unnecessary adjustments.
Monday – May 3, 2004
Before doing anything too drastic like changing out the diaphragm, Bernie and I did approximately 20 more test – trying different combinations of increasing and decreasing the stylus pressure as well as the rate at which the cylinder is turned. Some results ended with what sounded like an almost intelligible recording, to nothing at all. It appears that we will have to change out the present diaphragm. However, we are not sure if the diaphragm needs to be firmer or more flexible. Or perhaps it is the stylus that need to be changed.
We decided to call it a day and re-filed down the spent cylinder. Tomorrow is the last day to work on the phonograph, and we will try varying the diaphragm at that point.
Tuesday – May 4, 2004
Well today is the day. The last day to make any progress. And unfortunately despite the fact that we replaced the old diaphragm to a firmer one, the results did not end with an audible sound. This is extremely frustrating because the recordings sound so close to making intelligible sound! However, Rough Science website did say you have a 1 in 100 chance of being successful. And while we weren’t successful within the time frame, I would like to continue experimenting with producing sound. This has been a very interesting project for both Bernie and I, and while we weren’t successful in producing sound, I do feel a sense of accomplishment that we got as far as we did.
|